Thursday, June 25, 2009
Texas Sweet Hot Pickles
7 lbs. cucumbers, sliced into thick rounds
1 large onion, sliced into thin rings (about 3 c.)
1 c. pickling salt
ice cubes
12 c. water
6 c. vinegar
3 c. apple cider vinegar
7 c. cups sugar
4 Tblsp. yellow mustard seeds
1 tsp. turmeric
10 Tblsp. minced garlic
24 fresh jalapeno peppers
Pint size canning jars, seals & bands
Wash and sterilize jars, bands and seals. Keep jars hot until ready for use.
Place cucumbers, onion & pickling salt into the sink. Mix well to make sure the salt coats everything. Add in enough ice to make to sure that the cucumbers and onions are completely surrounded. Let sit for 2 hours. DO NOT SKIP THIS STEP AS IT HELPS THE CUCUMBER SLICES TO CRISP UP. After your 2 hours is up, drain and rinse cucumbers & onions completely. Set aside.
In a large pot combine water, both vinegars, sugar, mustard seeds, turmeric, cloves, garlic, and peppers. You will want to slice one side of your jalapenos open, before adding to pot, to help release your pepper flavor and heat. (see above photo) Stir to mix. Bring mixture to a boil.
Reduce heat to med-low and add in the drained cucumbers and onions. Let mixture come to a simmer then remove from heat.
Immediately fill hot jars with pickle mixture, making sure to leave a 1/4" head space. Wipe rims clean with a damp towel to make sure rims are free of any dripage. Place seal and bands on each jar. Tighten to finger tight. Do not over tighten. Place jars in a water bath canner and process for 15 minutes. Remember that your time does not start until the water has come to a full rolling boil. Remove jars from canner and allow to cool completely. As jars cool you will hear the seals begin to "ping" as they seal. Once jars are completely cooled tighten bands. Allow jars to sit and marinade for at least 2 weeks before using to get full effects of flavor.
Click HERE for printable recipe
Wednesday, June 17, 2009
A Fiesta For Your Taste Buds
Firey Texas Pickles
1 lb. jalapeno peppers
3 1/2 c. vinegar
1 1/2 c. water
1 tsp. pickling salt
1 Tblsp. sugar
1 1/2 Tblsp. minced garlic
LARGE BATCH:
6 lb. jalapeno peppers
5 c. vinegar
1 c. water
4 tsp. pickling salt
2 Tblsp. sugar
2 cloves garlic; minced
Sterilize half-pint or pint size jars, bands & seals. Keep jars hot until ready to use.
When working with peppers, it is advisable to wear rubber gloves to prevent skin irritation.
Combine vinegar, water, pickling salt, sugar & garlic in a large sauce pot. Heat to boiling, then allow to simmer for 10 minutes.
Wash peppers & slice into rings. Blanch in boiling water for 30 seconds.
Fill jars with pepper slices leaving a 1/2 inch head space. Pour hot pickling solution over peppers leaving 1/2 inch head space. Wipe rims with a clean, damp cloth to remove any drips. Place seal and bands on each jar. Tighten until finger tip tight.
Place in a water bath canner and process jars for 15 minutes. **Remember, processing time does not start until water has come to a full rolling boil.**
Remove jars from canner and allow to cool. Check to make sure seals have properly sealed.Tuesday, June 16, 2009
Flea Police
Instead of buying those chemically treated shampoo's that cost an arm and a leg, I stretch our dog shampoo by using any citrus scented dish washing liquid. Since I can buy Ajax pink grapefruit for less than a $1.00...that is my soap of choice. The fleas do not like citrus at all so it works wonderfully to kill those nasty things. You can literally see the fleas dying off and dropping like flies into the wash water. Once I am done with that round of washing, I only need a dime full of the store bought oatmeal & baking soda dog shampoo to help soothe their skin and help balance the oils in their coat. No more stinky doggies!
Now that we have tackled the fleas from the outside, it's time to work on getting rid of them from the inside. Unlike bath time, the dogs like this flea "treat"ment.
3 cubes beef bouillon
1-1/2 c. boiling water
2 c. whole wheat flour
1 c. cornmeal
2/3 c. brewers' yeast
2 Tblsp. garlic powder
2 egg yolks
Preheat oven to 375*
Dissolve beef bouillon cubes in boiling water, and set aside. Grease cookie sheets.
In a large bowl, stir together the whole wheat flour, corn meal, brewers yeast, and garlic powder. Add the yolks, then gradually pour in the bouillon water while stirring. Mix thoroughly to form a firm dough.
On a floured surface, roll the dough out to 1/4 inch thickness. Cut into desired shapes using cookie cutters. Place cookies one inch apart onto cookie sheets.
Bake for 20 minutes, then turn off oven. Leave the cookies inside for at least 3 hours or overnight to harden. Store in an airtight container.
Click HERE for printable recipeFlea Be-Gone Dog Treats #2
1 c. flour
1/4 c. wheat germ
1/4 c. brewer’s yeast
1 tsp. salt
1 Tblsp. plus 1-1/2 tsp. canola oil
optional additions:
1 clove garlic chopped, or 1 tsp. powdered garlic
1/2 c. chicken stock plus 3 Tblsp. for basting
Preheat oven to 400*
Line a cookie sheet pan with parchment paper or a silpat. Set aside.
Mix flour, wheat germ, brewer’s yeast, and salt together in a medium bowl. In a mixing bowl, combine oil & garlic. Alternately add 1/2 cup chicken stock & flour mixture in 3 parts. Mix well. Turn dough out onto a floured surface & knead by hand for about 2 minutes. you may want to flour your hands as dough will be sticky.
Lightly flour your work surface again then roll dough out to about 1/2" thickness; just as if you were making biscuits. Cut out shapes either free hand or using cookie cutters & place on lined cookie sheet.
Bake for 10 minutes, then rotate baking sheet. Baste with remaining 3 Tblsp. chicken stock. Bake for 10 minutes longer. Turn off oven & leave oven door closed. Allow pan to remain in oven for about an hour & a half longer. Store in an airtight container.
Click HERE for printable recipe
Monday, June 15, 2009
Fast Fix Dinner
I am sharing the full recipe for this, but note that today I am only using 1 lb. of ground meat instead of 3 lbs. Since it's just the two of us for dinner tonight, I cut thge recipe to reflect the portion size that we need.
Crockpot Sloppy Joes
(oops! the ketchup & buillon
are missing in the photo)
3 pounds ground beef
1 c. onion, finely-diced
1/4 c. finely-diced celery
1/2 green bell pepper, diced
2 cloves garlic, minced
2 Tblsp. Worcestershire sauce
1 c. ketchup
1 (6-oz) can tomato paste
1-1/4 c. water
2 tsp. beef bouillon granules*
1 tsp. paprika
1/4 tsp. black pepper
3 Tblsp. cider vinegar
3 Tblsp. brown sugar
1 tsp. dry mustard
In a skillet, cook meat until no longer pink. Drain fat then return to skillet. Add celery, bell pepper, onion and garlic. Saute until vegetables are softened. Pour meat mixture into crockpot. Next add all remaining ingredients to the meat & vegetable mixture to the crockpot. Stir until well combined. Cover & cook on Low for 6 to 8 hours or High for 3 to 4 hours. Serve over toasted hamburger buns or bread slices.
*Note: because buillon usually has salt added to it, I don't suggest adding salt to this recipe at first. The need for more salt will be based on your personal taste.
Click HERE for printable recipe
Wednesday, June 3, 2009
Don't Throw It Out ~ Make Jelly Instead
So with that in mind, I want to share a recipe with you that might make you rethink your food trash. Instead of throwing out those corn cobs, give them a new life and purpose. Here's how...
Corn Cob Jelly
7-12 ears of cob corn
6 c. water
1 pkg. powdered pectin (I tried it with liquid as the photo shows but it did not set up as well, so I re-did it using powdered, as I normally do..and it worked great. This proves, change is not always good.)
4 c. sugar
yellow food color
Clean and sterilize 6-7 half pint size jars, as well as lids and seals in a water bath canner.
Cut kernels from corn cobs and save for later use. Place cobs in a large, heavy pot. Add water and bring to a rolling boil. Allow to boil for a full 10 minutes. Remove cobs and discard. Strain liquid through a jelly strainer. Measure out 4 cups of liquid. If the liquid is not 4 cups, add water to supplement.
Pour liquid back into pot and bring to a boil. Add in powdered pectin and bring to a boil. Stir in sugar and bring back to a full boil for 1 minute. Remove from heat and stir in a few drops of yellow food coloring.
Skim foam if necessary. Ladle hot liquid into hot sterile jars. Wipe rims of jars with a damp towel to remove any drips. Place seal and band on each jar. Tighten to finger tip tight. Place jars upside down on counter to seal. Once jars have completely cooled, turn right side up and check to make sure each seal has properly sealed.
If seals do not seal completely store in icebox and use soon or repeat process starting with clean sterile jars.
If you have never tried this, you really should. For those that might be wondering how it taste...it taste more like honey than jelly. Give it a try for yourself, you won't be disappointed.
Click HERE for printable recipe
Tuesday, June 2, 2009
Homemade Pizza Dough
1 Tblsp yeast
1-1/4 cup luke warm water (about 110*-you don't want it too hot or it will kill the yeast)
4 cups flour
1 tsp grey sea salt
2 Tblsp olive oil
1 Tblsp honey
In a small bowl, combine the water, honey and yeast. Stir until dissolved. Allow mixture to sit until yeast "activates" & a layer of froth develops on the surface.
In a large mixing bowl, combine salt & flour.
Add yeast & olive oil.
Mix together, using the dough hook of your mixer. Continue to mix dough, increasing speed a little at a time so motor does not over heat from the weight of the dough. Allow dough hook to knead the dough until it is smooth, shiny and elastic (about 5 - 10 minutes.) If the dough is too sticky or soft, add extra flour (a Tblsp at a time) or if it's too dry and crumbly, add water (a Tblsp at a time).
Place dough into a large, oiled bowl. Turn dough once to coat with oil. Cover with a damp cloth and allow to rise until double in size.
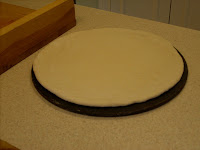
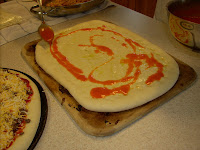
Punch dough down, then transfer to a lightly floured counter or bread board. Divide dough in half and shape each piece into round disks, rolling out to 12-13" pizzas. (We also made a square pizza to show that you are not limited to just using the basic round shape.) Place onto a pizza stone or cookie sheet lined with a silpat. (Look at those strong arms rolling out the dough...there's nothing better than working along side my hubby in the kitchen.)
Brush lightly with oil and let them rise again, for about 20 minutes.
Your pizzas are now ready to add the toppings, sauce and cheese of your choice. We chose to make a taco pizza
& a buffalo chicken pizza.
Bake at 400* for 10 minutes or until cheese is melted and crust is browned.
Click HERE for printable recipe