Thursday, February 18, 2010

Low Calorie Chicken Fried Rice


This main dish is tasty, low in fat and lower in calories than traditional fried rice dishes. Best yet, it only takes a few minutes to prepare.

Low Calorie Chicken Fried Rice
1 tsp. olive oil
1/4 of an onion, diced
2 ribs celery, diced
1/4 c. chopped carrots
1/4 c. chopped fresh spinach
1 Tblsp. minced garlic
6 egg whites
1 c. precooked diced chicken breast
1-2 c. cooked brown rice
1 Tblsp. Bragg's liquid amino (or use low sodium soy sauce)
salt & pepper to taste


In a large skillet, heat oil over med-low heat. Saute onions, carrots and celery until softened. Stir in garlic and spinach and saute for 3-5 minutes or until spinach is very wilted. Remove from pan and set aside. In same skillet, scramble egg whites until done. To the eggs, add chicken, combining well. Stir in brown rice, cooked vegetables & bragg's liquid amino. Allow mixture to heat completely. Season with salt & pepper as desired.

Click HERE for printable recipe

Tuesday, February 16, 2010

Healthier Low Calorie Breakfast Burritos

Yesterday was a busy day in the kitchen...I made almost 50 healthier, low calorie breakfast burritos to have on hand for those quick start meals. I love my Mexican food, but we all know how fattening it can be. This is my version of the breakfast burrito that is healthier and has less calories and fat than traditional ones do. Feeding your family healthier foods at a reasonable cost really can be Homespun Simplicity.

The first and most important thing to making these tasty low calorie burritos is to start with a healthier version of the tortilla. Instead of buying flour or corn, go for whole wheat. If you have the extra to spend, go with a sprout grain tortilla, such as the one from Ezekiel bread brand. Normally the sprout grain tortillas are the ones that I buy as they are only 80 calories. Most traditional tortillas are in the 200+ calorie range. That is a big difference! You also have to really watch the whole wheat tortillas as they can even carry 180 calories. However, at Kroger I found Mission brand Carb Balance Plus Whole Wheat Tortillas. I checked the calories and they too only had 80 calories and a low fat calorie count. Since I knew I would need several packages, I decided to go with this brand over Ezekiel, solely for the price consideration. Now that we have our foundation for the burritos, let's get cooking!

Healthier, Low Cal Breakfast Burritos

I am using a myriad of ingredients so that I can get a good variety in our burritos. We have our eggs, turkey bacon, Canadian bacon, 2% grated cheese, black beans and onion.


We will not be using the entire egg, only the whites, so begin by separating your eggs. I have an egg separator that I use but it can easily be done the old fashioned way with the just the egg and the shell method. (Don't toss those yolks though...you can use them for other uses.) Once eggs are separated, set them aside. (While you can buy egg whites or egg white substitute at the market, I find that it is much cheaper to buy the whole egg and separate it myself.)


Don't throw your egg shells away though, remember they can be nicely used in your compost pile!


Heat 1 tsp. olive oil in a skillet. Depending upon how much onion you care to use (I am using 1 fairly nice size one) dice up the onion and cook in oiled skillet until soft and translucent.


I really prefer to use homemade black beans, but since I didn't have any on hand I went ahead and pulled out the can version. So take your canned beans and drain them, reserving the liquid. Rinse and drain beans. Place beans into a food processor along with your cooked onions. Pulse to mash beans. Keep an eye on the consistency of the beans as they mash..if they are too dry add in some of the reserved liquid. You don't want runny beans but you don't want them dry either. Ultimately what you are achieving is re-fried black beans with no lard or extra fat. The reason I add the onions into the beans is to have the flavor but "hide" them from those who might normally complain about the texture of eating onions. This is a great trick to use on the kids.


Next let's work on our meats. I am using turkey bacon and Canadian bacon. Cut your bacon in half. You don't really need a full slice in each burrito. (I did the same with the Canadian bacon, but forgot to take a "before" photo.) In the same skillet you cooked the onions in, place your bacon pieces and cook until done. (There will still be a small amount of oil in the skillet from cooking the onions, so I didn't add anymore.)


Remove meat from skillet once cooked and place on a paper towel lined plate to absorb any remaining oil.


Back to your egg whites...season as desired (I used a bit of salsa, black pepper and garlic powder) and scramble until completely cooked.


Look at how light and fluffy those scrambled egg whites are.


Now it's time to get down to the business of assembling your burritos. Prepare your work station with everything you are going to put into them. I have my tortillas, re-fried beans, scrambled egg whites, cooked bacon's, jalapeno pepper slices and my grated cheese. I also put down cookie sheets to use in the assembly. This helps keep any spills or overflow from the burrito in one contained area instead of all over the counter top.
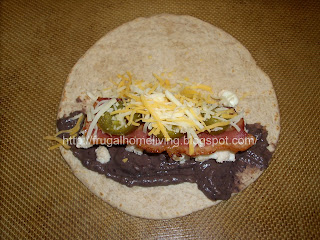

Fill each burrito with your desired ingredients. Here I have layered the beans, egg, bacon, peppers and cheese.


Roll filled tortilla up burrito style and wrap in foil.


Make sure to label your burritos or you'll end up with a surprise each time you grab one! These freeze wonderfully and can be heated in the microwave in no time at all.

Thursday, February 11, 2010

Turkey Chili (Version 2)


It has been raining for d-a-y-s now. It seems like there is no reprieve in sight. So what else is there to do when it's wet and cold out? Stay inside and warm up with a bowl of hot homemade chili.


Turkey Chili
1 Tblsp. olive oil
1 lb. lean ground turkey
1 large shallot (I also used a piece of leftover red onion to use it up but it's not necessary)
1/2 c. diced green bell pepper
2 Tblsp. minced garlic
5 small jalapeno peppers, diced (adjust according to your heat preference)
1 tsp. dried oregano
1 Tblsp. cayenne pepper
1/2 tsp. crushed red pepper flakes
3 Tblsp. chili powder
1/4 tsp. ground cinnamon (not pictured as I forgot to show it)
2 tsp. ground cumin
salt and pepper to taste
1 (15 oz) can red kidney beans, rinsed & drained
1 (15 oz) can pinto beans, rinsed & drained
1 (10 oz) can diced tomatoes with green chiles
1 (15 oz) can tomato sauce
1 (15 oz) can whole peeled tomatoes (or use plain diced tomatoes)
1 (6 oz) can tomato paste
3 pints turkey stock


In a pre-heated large, heavy stockpot add olive oil. Add in shallots and bell pepper. Saute until tender and shallots are somewhat translucent.


N
ext add in ground turkey making sure to break meat up to help evenly cook. Stir in garlic. Let meat brown until no longer pink.


Once meat us browned, add in diced jalapenos. Saute for about 5 minutes.


Pour in rinsed & drained beans.


Add dry spices to meat mixture.


Pour in diced tomatoes & green chiles, tomato sauce and only the juice of the whole peeled tomatoes.


Roughly chop the whole peeled tomatoes and add to pot.


Pour in stock and stir. If chili is too thick, add in water a 1/2 cup at a time until desired amount is achieved.


Add in tomato paste and mix well.


Bring chili to a boil, then reduce heat to low and cover slightly. Stirring often, allow chili to simmer until thickened, about 30 - 45 minutes. Remove from heat. Serve over hot cooked brown rice.

Click HERE for printable recipe

**for a slightly different version of my turkey chili click here

Tuesday, February 2, 2010

Chili Garlic Balsamic Shrimp


(Shrimp & Pesto Pasta)
In the mood for something spicy yet with a little sweet? This recipe is sure to hit the spot.

Chili Garlic Balsamic Shrimp

1 lb. fresh, peeled & deveined shrimp
1/4 tsp. grated fresh ginger
1/4 c. Bragg's liquid amino (or low sodium soy sauce)
1/4 c. balsamic vinegar
4 Tblsp. olive oil
3 Tblsp. chili garlic sauce (less if you are not a fan of spicy heat)
1 tsp. minced garlic
pinch of kosher salt
1/4 tsp. black pepper


In a medium size bowl combine all ingredients except for shrimp. Stir to mix well. Fold in shrimp, making sure to coat completely. Cover and refrigerate for about 30 minutes.

Remove from refrigerator and grill over medium heat until pink-orange in color; about 7-12 minutes, depending upon how large the shrimp are. If you are using a gas grill, make sure you turn shrimp at least once for even grilling. Taste great over whole wheat or spelt pasta, with stir fry vegetables & brown rice or in a wrap.

Click HERE for printable recipe

Monday, February 1, 2010

Going Green...Turnip & Leek Soup


With the weather turning cold and wet...yet again...what better to put on the table than a nice pot of soup. So today's menu features a low fat, non dairy, creamed leek soup. This isn't your typical heavy cream style leek soup...it's a healthy, low calorie version that is just as yummy.


Turnip & Leek Soup
1 Tblsp. olive oil
2 leeks, white and green parts washed and sliced
2 c. onion, diced
1/2 tsp. curry sea salt (or kosher salt)
3 Tblsp. minced garlic
2 large turnips (about 1 pound); peeled & diced into cubes (or potatoes) {I am using fresh frozen}
4 c. chicken stock
3 tsp. dried rosemary

Add oil to a preheated heavy stock pot. Add the leeks, onion, and sea salt and saute for about 5 minutes, stirring often, until the onion begins to turn translucent. Add the garlic and stir well. Cook for another minute. Add turnips, stock & rosemary; bring to a boil & cover. Reduce heat to simmer. Cook for about 20 minutes or until parsnips are fork tender. (since I am using blanched turnips from my freezer cooking time will vary.) Using an immersion blender, blend soup until smooth. Let simmer and serve warm.

Click HERE for printable recipe